Tuesday, March 29, 2011

Red Lobster-esque Biscuits

I don't know if everyone has a Red Lobster restaurant around where they live...
but I LOVE their biscuits. About a year ago I found a recipe for them online.
Tonight I made these yummy biscuits to go with our dinner
and I just had to share them with you all!

Here's what you'll need:


The glass of Diet Dr. Pepper is totally optional! Didn't notice it lurking there in the shot. But other than that: Milk, Bisquick, Shredded Cheddar (we were almost out so I subbed some mozzarella), garlic powder, butter, oregano and garlic salt. Preheat your oven to 400 and grease a cookie sheet.

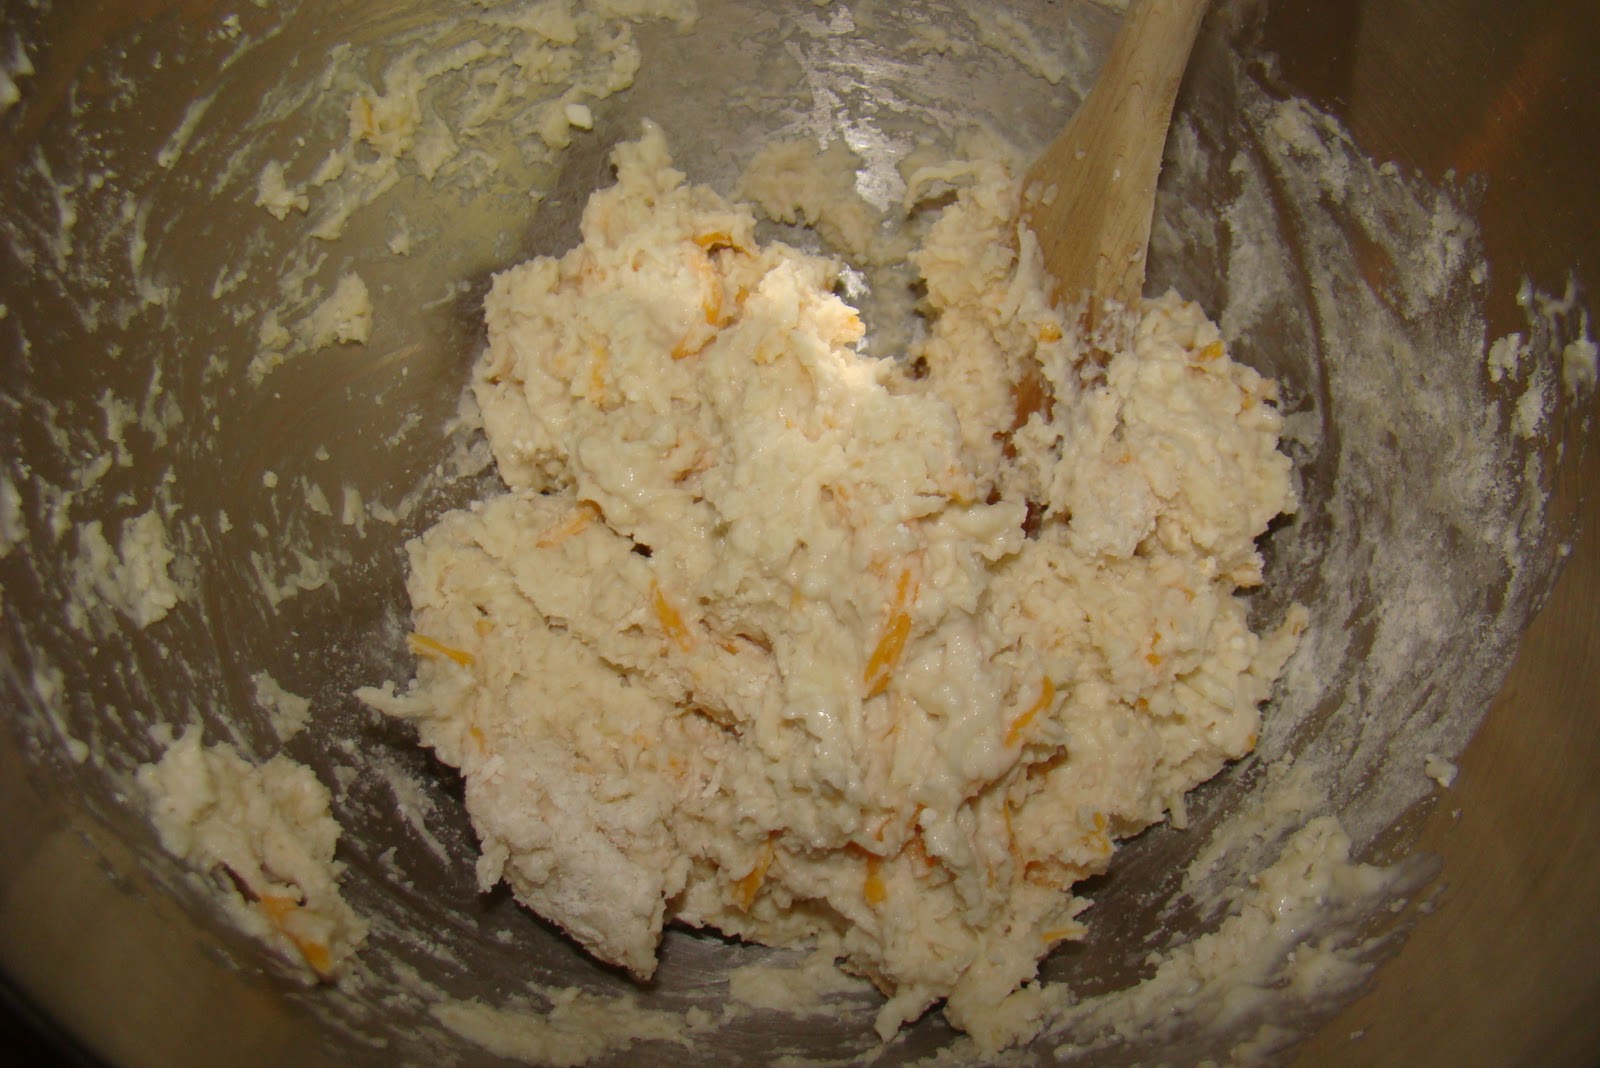
Mix two cups of Bisquick, a 1/2 tsp of garlic powder and one and a half cups of shredded cheese together.


Then add 2/3 cup of milk. The mix will be THICK!


Drop by the spoonful onto the greased cookie sheet.


Pop into the oven for 10 minutes. While your biscuits are baking, melt your butter. The recipe calls for 2 Tablespoons, but it never went far enough. These biscuits are THIRSTY and the more butter the merrier...right? So I melt a whole stick. Then mix in 2 tsp of dried oregano and 1 tsp of garlic salt.

After the 10 minutes, pull out your biscuits and brush them with the butter mixture. I have a handy tool:


It's a duck feather pastry brush. I found it at the Czech Museum in Cedar Rapids, IA! My great grandmother used these all the time and I LOVE it!


Pop them back into the oven for another 5 minutes. When times up, brush them again.


Then serve them up to some happy customers!


Photobucket

Sunday, March 27, 2011

Pine Wood Derby

So we're a Scouting Family.
It started last year, when Louie decided he wanted to go camping and shoot arrows and yell Den yells.
And when our family does something...
We do it BIG!
Which means I'm the Den Leader.
And my husband is the new Cub Master.
We sound like Rick Moranis & Sigourney Weaver in Ghostbusters.
"Are you the Cub Master? I'm the Den Leader."

ANYWAY!

I don't mean to complain. We've had a lot of fun!
I've got a great Den of 9 boys. Woo Hoo!!!

So the Pinewood Derby was this weekend.
If you don't know about this, here's the set up. The boys get a block of wood, four wheels and four nails. They need to turn this into a racing machine. There are strict rules about axles and lube (seriously...wheel lube) and a bunch of stuff I don't get into. This is a job for Son & Dad. The car has to weigh 5 oz. Then we all get together and race them on this track. It's VERY high tech...figures out the mph,
whatever's and whatnot's. I show up, chat with some parents, munch on some doughnuts and take pictures!

I just noticed how crooked the wheels are! Oops!

Each Scout has an assigned number. They bring their car in. It gets weighed and put on this mat. No Touching your car after official weigh in!

Here's the track. The cars get loaded at the top of the far end. Then they race down the slope towards the finish line. This table to the right is where the track owner has his computer hooked up. There was a big screen off to the left that showed the boy's name, lane and finishing results. Hi-Tech!

Here is one of the rounds of racing. Louie's car is the yellow one. He came in second here. The boys each race four times with different cars. Then the computer compiles all their information and poops out who the fastest is by Pack & Den.

And here are the trophies! These boys take their trophies seriously!
Louie got one of the little ones...Fourth Place in his Den.
Not too shabby!

Photobucket


Saturday, March 26, 2011

Cream Cheese Mints

My hubby's Mom & Grandmother have Mint Making down to an art!
They do weddings, graduations, showers...you name it.
So I didn't hesitate to ask if they'd like to make some mints for Louie's
First Communion celebration next weekend.

We got together last night and whipped some out!

They mix up a bag of confectioners sugar and a block of cream cheese.
Here's my Lovely Hand Model (MIL) doing so:


Then they mix in a tsp. of peppermint extract. You can add almond, or any flavor you fancy!

And we picked out the shapes we wanted. Louie's statement was "NO FLOWERS, MOM!"

He liked the cross and the praying hands, but to add come color we picked the clover shape.
They did a unit at school using a clover to represent the Father, Son & Holy Spirit.


We then split up the dough and kept half white and added green coloring to the other half.


To get our work surface ready, we put down parchment paper and
fill some shallow bowls with granulated sugar.


We fill the molds with sugar to make it easier for the dough to come out. Then pinch of a small amount of dough and roll it into a ball. Roll the ball around in the sugar. (This is a very HEALTHY recipe!!!)


Press your sugary low-cal dough ball into your sugared up mold! When you turn the mold over and
gently tap on it (hopefully) you'll get a perfectly shaped mint. If not, re-roll and try again!


Here's a shot of Louie doing the praying hands with Great Grandma Ginger!


Photobucket

Rainbow Cupcakes

Here is a little something we did for St. Patrick's Day and I'm just getting around to posting now!

I've been seeing these Rainbow Cupcakes EVERYWHERE!!! Two of my favorites, though, were:

Running With Glitter

I started with a box of white cake mix and mixed it up using the box directions. Then I divided the batter up between six bowls. I added food coloring to each bowl to make each color of the rainbow (except Indigo. poor forgotten Indigo.).


PRETTY!

Then things started getting hairy. My boys...in their most "helpful" manner...wanted to say layer the colors. I didn't get a good shot of this, because I kept saying, "Remember. Roy G. Biv! Only Backwards!"
I know better to put the nix on some Boy Cooking Fun...they were flinging colorful batter all over the cupcake liners. Oh well.

What was SUPPOSED to happen was this: Dollop a spoon of purple on the bottom of each liner. Then do blue, green, yellow, orange & red. I spread the colors out a little, but I didn't want to mix them up too much. I was able to squeeze out two cupcakes in the proper color order. The rest looked like a Dr. Seuss experiments!

Then bake you cupcakes following your package instructions. And let them cool.


This is what they'll look like when done.


MUFFIN TOP! heeheehee...makes me laugh.

I topped ours with Vanilla frosting and those little round sprinkles (Nonpareils???).


Can you taste the Rainbow? Nom Nom Nom

Photobucket

Thursday, March 24, 2011

Look, Ma! I'm Knitting!!!

Sort-a. I'm sort-a knitting. But it's a start! And I'm very excited!!

I read this awesome blog, Make It and Love It. And they read my mind and are running a "Learn To Knit" mini-series. Yes, please! I grabbed Kat and ran to the nearest Michaels to get my supplies.

Then I came home and tried to knit. Hmmm. Then I tried some more. Ummmm. Some more?

I've got to say Rebecca (the lovely lady who is doing this Mini-Series) does a Tremendous Job...great directions, photos...she even includes a youtube video for people who need some live action shots.

I'm going to blame my stubborn left-handedness on my problems. I figured I could knit like a normal right-handed person. Apparently my brain doesn't roll that way.

So I flipped everything backwards and tried again. And it worked!!! YAY!

I can cast on like a beast! I had so much fun, I busted my Mom's stash she inherited from my Grandmother and grabbed all the knitting needles (Mom crochets). And I casted on like a fool!


The green, white & pink are on Size 8 needles. The burgundy is on a size 10. The blue is on a size 7.

Looks pretty good?


Well. Practice makes perfect. So I ripped them all up and did them again.

Now I was ready (or so I thought) for the next step.

Again. I think my brain is wired a bit strangely. I tried and tried. Then I swore I would crochet until the day I died. Tried some more. Said some nasty things to those poor needles (sorry needles). But then it just clicked. Not sure what happened. But here's where I am!


I'm pretty proud!

I'm also VERY PROUD to say that my

Wash-Cloth Bunnies are being featured over at Ucreate With Kids!


Photobucket

Thursday, March 17, 2011

Erin-Go-Wreath

When Louie was a baby, I bought him a CD called Sunday School Favorites.
We LOVE it!
But our favorite song...and one we sing ALL the time goes like this...

May the road rise to meet you,
And the wind be at your back.
And the Lord hold you always
In the hollow of his hand!

It's called the Irish Blessing Song and I just wanted to share it with you all!

Now. I'm. Ready. To. Take. A. Giant. Leap.

I've got a really ugly front door. So ugly it could win an ugly door contest.
But I made this really cute Irish-y wreath that I want to share.
So, I think I'm ready to share our ugly front door with the world.
Promise not to laugh. Or gag.


I know, right! And this is from the inside...the outside is worse!
But the wreath is cute!

Wanna know what I did?


I started with a Dollar Tree wreath form.The guy at our Dollar Tree must think I'm nuts. In the last few weeks I've bought five of these. Anyway...cut out about 10 Zillion circles from felt in the colors you want. And grab your straight pin box. Really...are there any sort of pins that aren't straight? Curly pins? Zig zag pins? Just curious...

Grab a circle and then fold it in half. Now fold it in half again. It will look like a little green (or whatever color) pie wedge. Then spear the tip of your new felt pie with a pin. Like this.


Only make sure you get a manicure first! SORRY! Then stab the pin into your wreath form.


Now repeat this process 10 Zillion more times...filling up the wreath!

And...Taaa Daaa!


A pretty wreath on a nasty door!

I promise to paint my UFD (ugly front door) this summer and I'll try to do something with those horrible diamond windows. Buying a new door would probably be the easiest route to go...but I'm cheap  all about reduce, re-use, recycle! Plus the word shimmy kind of bugs me.


Photobucket

Wednesday, March 16, 2011

Shamrock Hair Clip

I'm running around a little crazy today! We had our Pack Meeting tonight and my hubby is the new Cubmaster. Go James! He did a great job. Tonight was the advancement ceremony for the boys. So we're the proud parents of a full-fledged Wolf Scout. For any of you scouting families out there...you know how involved this all gets. For those non-scouting families out there...it gets involved!

And tomorrow our Den (I'm CubMama to 9 second graders) is doing a skit in the all school talent show. I think I'm more nervous than the boys! I know they'll do a great job...but they're just so onery energetic! Fingers crossed!

Now on to some Crafty Stuff...

I made this cute & festive hair clip for Kat:


I found the idea at Skip To My Lou and used the pattern for the shamrock pin instead of the garland. Then I covered an alligator clip with ribbon and hot glued the shamrock on the top! I made it for Kat's hair, but I kind of like it clipped onto the dusty real-life lampshade. I might make some up for next year and clip them around the house.


I am SO a beginner at crochet, but this was really easy and fun! I whipped it out in about five minutes! And Kat loves her, "Frower"!

Photobucket

Partying HERE!


giveaways

Monday, March 14, 2011

And The Winner Is...

Happy Monday Everyone!

Time to announce the WINNER of my First Ever Giveaway!

Here's what I did...I wrote down everybody's name on a scrap of paper and threw them into a hat.


This was my Great grandfather's (Pappy) Fedora. LOVE it!

Then I grabbed my trusty three year old.


Don't you feel comfortable that your fate is in this cute little one's hands?!?

I had said three year old pick a winner from the hat.


He was like, "YAY! I picked one! What do I win???"

And...Drum Roll...the Lucky winner of the $15 gift code to CSN Stores is...


STEVIE at Moore Babies!

Congrats, Stevie! I'll be sending you the gift code you can use to purchase something cool!

Thanks to everyone who commented and new followers! I hope to be able to do more giveaways in the future!


Photobucket