I haven't disappeared from the World O' Blogs!!! I'm just in hibernation after all the JOY of Christmas!
I feel bad for neglecting my blog...especially since I'm trying to build it up and am getting some followers! YAY!!! Thanks, ladies!
I am also working on a big surprise...can't tell you about it yet...but I should be back in full swing next Monday!!!
So don't give up on me...I'm stuffed full of cookies and peeking out from a mountain of blankets while the kidlets play with all their new goodies!
Thursday, December 30, 2010
Sunday, December 26, 2010
Rag Wreath Ornament
This is my final ornament of the year! And I'm a day late...
Last night we came home from a full, fun, Blessed Christmas Day of celebration. I wanted to snuggle with my hubby for awhile before doing my post. And I did! A little too snuggly. Because I zonked out!!! Next thing I knew it was bright outside, our boys were bouncing on our bed and chanting that they wanted candy for breakfast. WHOOPS!
I took some left over wire from one of those crazy kits I've mentioned before that look cool but never really work for us. And I formed a circle. Then I took a bunch of ribbon scraps from this month's crafting frenzy and started to tie them around the wire.

Nice and scrappy! So I just kept going all the way around.

I really enjoy these fast and unstructured projects! It seems like they usually turn out the coolest! I'm already thinking of making a ribbon wreath for Valentines...Fourth of July...Halloween... So much crafting and so little time!!!
Now I'm off to play with the kiddos and all the new stuff that has invaded our home!
Friday, December 24, 2010
The "Amy Special" Ornament!!!
MERRY CHRISTMAS EVE to All!!!
Christmas Eve is the day that we've always celebrated with my mother's side of the family. Now that James and I have our own little family, it works out great because his family celebrates Christmas Day!
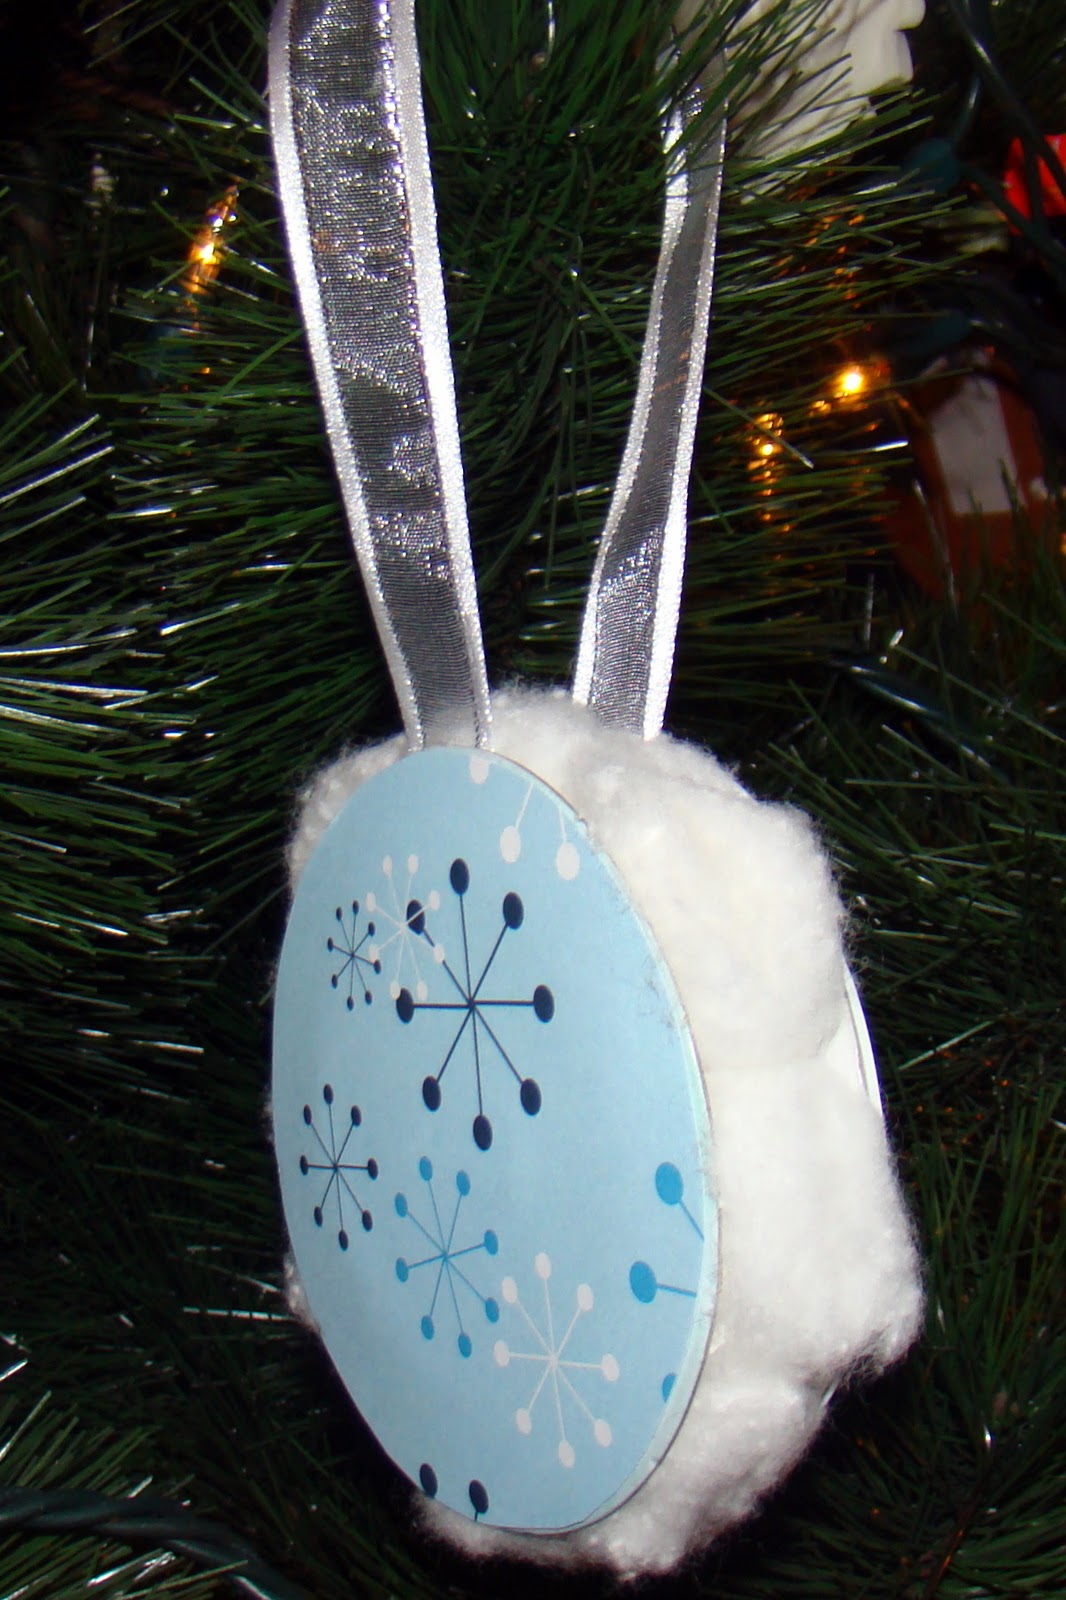
So I'm taking a moment from our crazy, busy, fun day to post this funky ornament I came up with. I call it the Amy Special...because it makes me feel...special...I'm babbling now...
SO! I've used up 20 miles of ribbon this year and I've got lots of these in the recycle bin.

And I have a small forest worth of scrap paper that I'm sure I'll use SOMEDAY. So I traced my ribbon holder onto some cute paper.

And then I glued the circles onto each side. But there was a vast desert of cardboard where the ribbon used to be.

Hmmmm...snowflake paper. Snowflake fanatic. Lot's of cotton balls in my bathroom cabinet. EUREKA! I grabbed the bag of cotton balls and started cutting some in half. Have you ever cut a cotton ball in half? Those puppies have LAYERS. Cotton balls are like onions. Onions have layers. Sorry! I just had a Shrek moment!

Note the Ogre/Onion/Cotton Layers. ANYWAY! I glued the cotton balls along the barren cardboard.

Taaa Daaaa! A cute snowflake ~ cloud ~ frosty sandwich! Or, rather, the Amy Special!
For those of you who celebrate tonight, or tomorrow, or whenever...May your day be Merry & Bright! God Bless you and your families!!!
Christmas Eve is the day that we've always celebrated with my mother's side of the family. Now that James and I have our own little family, it works out great because his family celebrates Christmas Day!
So I'm taking a moment from our crazy, busy, fun day to post this funky ornament I came up with. I call it the Amy Special...because it makes me feel...special...I'm babbling now...
SO! I've used up 20 miles of ribbon this year and I've got lots of these in the recycle bin.

And I have a small forest worth of scrap paper that I'm sure I'll use SOMEDAY. So I traced my ribbon holder onto some cute paper.

And then I glued the circles onto each side. But there was a vast desert of cardboard where the ribbon used to be.

Hmmmm...snowflake paper. Snowflake fanatic. Lot's of cotton balls in my bathroom cabinet. EUREKA! I grabbed the bag of cotton balls and started cutting some in half. Have you ever cut a cotton ball in half? Those puppies have LAYERS. Cotton balls are like onions. Onions have layers. Sorry! I just had a Shrek moment!

Note the Ogre/Onion/Cotton Layers. ANYWAY! I glued the cotton balls along the barren cardboard.
Taaa Daaaa! A cute snowflake ~ cloud ~ frosty sandwich! Or, rather, the Amy Special!
For those of you who celebrate tonight, or tomorrow, or whenever...May your day be Merry & Bright! God Bless you and your families!!!
Thursday, December 23, 2010
Stained Glue Snowflake
I would you all to say a prayer for whoever over at Holiday Crafts & Creations made this ornament. They are probably NUTS right now... So I spotted these beautiful snowflakes over there. I LOVE snowflakes and couldn't wait to make them. The process is a little long, but they gave fantastic directions.
All that being said...they are a total pain-in-the-rump. Bah Humbug. Easy my FOOT! I was up to my ears in glue globs. It took forever to dry and then I was up to my ears in glue glob again, only this time it was tinted blue!
At least their end result justified the means...mine just turned out like this:

Epic Icky! Well...maybe not epic...but definately icky. Wait. Maybe if we back up a bit???

Yeah. No. Doesn't help! We won't be doing this one again!!!
All that being said...they are a total pain-in-the-rump. Bah Humbug. Easy my FOOT! I was up to my ears in glue globs. It took forever to dry and then I was up to my ears in glue glob again, only this time it was tinted blue!
At least their end result justified the means...mine just turned out like this:

Yeah. No. Doesn't help! We won't be doing this one again!!!
Wednesday, December 22, 2010
Twisted Pony Beads
Does that sound too much like a heavy metal song? I'm not sure what else to call this ornament creation. I needed something quick today. We started out this morning with a fantastic play-date. Then it was Louie's school Christmas party. Then we had a birthday party to get Louie to. I'm not complaining...I sort of like the hustle and bustle sometimes.
However...(shhhhhhh! don't tell!) I haven't started baking yet! YIKES! So I wanted something simple and festive. I handed Louie a pipe cleaner and my tub-o-beads and the only requirement was that he do a pattern in "Christmas colors". Then we wrapped it around a marker to get the boingy spring shape.

I really like it! The photo doesn't do it justice, but it looks pretty neat hanging on the tree! Now I'm off to make a bazillion cookies...
Tuesday, December 21, 2010
Folksy Felt Snowman
Busy, Busy, Busy!!! I'm feeling the crunch as the time tick-tocks towards Christmas Eve/Day. We celebrate on Christmas Eve with my side of the family and Christmas Day with my hubby's side. The kiddos are over-the-moon excited about everything and I'm crafting, wrapping and baking like a lunatic. By the way...am I the only person in the world who thinks of the Fresh Prince of Bell Air when someone mentions wrapping??? RANDOM!
So. I'm up in the air about today's ornament. I found this cute little guy here. And how easy and simple! It was love at first sight. Then I tried to make him. Not so much. I'll let you be the judge:

Isn't he kind of Nightmare Before Christmas? A mixture of Jack and what's-the-girl's-name? Is my felt too white? Eyes to vacant? Or is it the zombie-stitched mouth? Well...I LOVE the way his nose turned out. That's something!
Monday, December 20, 2010
Rudolf The Red Nosed Reindeer
Last week one of Louie's spelling words was "reindeer". Appropriate, don't you think? Anyway...he missed it and spelled it "raindeer" instead. Ahhhhh, phonics!
So today's ornament is obviously a reindeer. I saw him here and had to try him for myself!
I started with a piece of brown construction paper and I fan folded it like this:

I'm digging my mad photo skills! Anyway, I pinched the folds together and then cut it up into little pieces. Here's what I got:

FUN! Then I stuffed them into my empty plastic bulb. Here's what that looks like:

And, finally, I glued on the eyes, nose and I wrapped some pipe cleaners around the top to form antlers. Last step...hang your "Raindeer" on the tree!

Cute & Quick Christmas Gift
Here is an idea that the kids and me whipped up to give as gifts this year. At Louie's school, the kids always make a gift to bring home for Mom & Dad and I took last year's idea and morphed it a little. Here's the finished product:

We painted a finger on each child and then pressed it to the glass candle holder. I LOVE the stair step-ness that my kid's are at! Then I painted the noses, eyes and buttons on. Louie did the arms with a brown Sharpie. Then I Modge Podged around the base and sprinkled Epsom salt over the Modge Podge. It was kind-of sparse looking, so after it dried I did another coat. The texture is awesome! We added the candle and this cute little poem:

We painted a finger on each child and then pressed it to the glass candle holder. I LOVE the stair step-ness that my kid's are at! Then I painted the noses, eyes and buttons on. Louie did the arms with a brown Sharpie. Then I Modge Podged around the base and sprinkled Epsom salt over the Modge Podge. It was kind-of sparse looking, so after it dried I did another coat. The texture is awesome! We added the candle and this cute little poem:
Little Snowmen, One, Two, Three
Made by our fingers
As you can see
When you light the candle
It will burn so bright
To remind you that we Love you,
Day and Night!
Sunday, December 19, 2010
3D Paper Snowflake
Today's ornament (I'm not sure I can really call it an ornament) is a WHOPPER! It won't fit on our tree! Check it out:

It's HUGE, but isn't it pretty? I was a bit dubious when I started the cutting and rolling and taping process...but I'm so pleased with the way it turned out.
I won't even try to post instructions...I followed the ones posted here and they do a great job of telling you what to do with pictures of every step!
I used regular 8 1/2 x 11 computer paper to make this snowflake, and it would be just as easy to size it down...so maybe it might fit on the tree. But for now, we're enjoying this one hanging above our kitchen table!

Saturday, December 18, 2010
Wooden Craft Stick Ornaments
Seven more Ornaments left to go!!!
Today's is another fun ornament for the kids to do! It's also another one I got from here...Love this blog!
We did a tree:

Very simple. Glue the sticks in a triangle shape and then we cut another stick to make the trunk. We used water color because I thought a more washed look would be neat. Louie glued on the sequins, but you can decorate with paint, pom poms...whatever! We also did a reindeer:

How cute is this??? It's just an upside down "A"! Again, we used water color to paint, glued on eyes and a red nose! This little guy is my favorite! Lastly we did a star/snowflake...depending on who you are asking:

So...star or snowflake? What do you think? Louie thinks it's a star. J told him, "NO, Louie! Stars are yellow!" And I quietly agree with John. But, either way, we glued the sticks together, water colored them and then decorated away with more sequins. And art IS all about interpretation!
Today's is another fun ornament for the kids to do! It's also another one I got from here...Love this blog!
We did a tree:
Very simple. Glue the sticks in a triangle shape and then we cut another stick to make the trunk. We used water color because I thought a more washed look would be neat. Louie glued on the sequins, but you can decorate with paint, pom poms...whatever! We also did a reindeer:

How cute is this??? It's just an upside down "A"! Again, we used water color to paint, glued on eyes and a red nose! This little guy is my favorite! Lastly we did a star/snowflake...depending on who you are asking:

So...star or snowflake? What do you think? Louie thinks it's a star. J told him, "NO, Louie! Stars are yellow!" And I quietly agree with John. But, either way, we glued the sticks together, water colored them and then decorated away with more sequins. And art IS all about interpretation!
Rudolf the Red Nosed Reindeer(s)!
What's this??? A blog post that's NOT about ornaments??? Yep! I've been so focused on my self-imposed Ornament Challenge that I haven't even mentioned the other stuff we've been doing!
So I'd like to take this opportunity to introduce you to my Trio of Rudolph's!

This is a project we do every year like my Ghostie Feet. The kiddos trace their hands (I'm thinking you probably figured that out!) and a foot. Then you let them loose with the glue bottle and they glue on google eyes and pom pom noses! My children love them because they look "silly"! However this year...we had to do some individualizing.
J, our three year old, looked at his and said, "Mine needs glasses." We had to put J in glasses about a month ago and he's ALL about glasses! So here is his:

Then the boys decided their lil' sister's needed to look more "girlie". So here's Kat's:
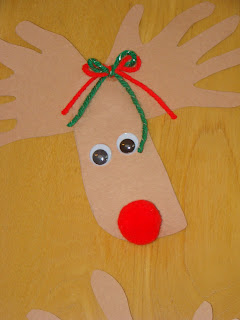
LOVE the bow! Children make the Christmas season SO much fun! They are so excited and when I look at their faces as we do crafts or decorate or sing carols...it's like they glow. Since we didn't do anything special with our oldest's reindeer, I'd like to share something he said to me on the way home from school the other day. "Mom, what do you think most people think of when they think about Christmas?" I answered that most people would first think of Santa and presents. Then he said, "I know. It's kind of sad. The first thing I think of is Baby Jesus." I had a Grinch-like heart swell! It was a definite moment when I whispered, "Thank you, God, for my wonderful family."
Friday, December 17, 2010
Scrapbook Paper Wreath
Thank Goodness it's Friday!!! I've got an incredible ton of things still left to get done by next week and I'm hoping to whip through a lot of it this weekend...fingers crossed...wish me luck!
Today's ornament is another wreath. I seem to be very into wreaths this year, but they are so easy and cute and you can make them out of anything: jingle bells, bulbs, rosettes, pop bottle caps...scrapbook paper!
I found this idea here and just had to try it. I've got a paper punch that can do two different circle sizes and PLENTY of holiday paper.
I simply cut out ten bigger circles in a dark red and then ten smaller circles in my holly print. Then I glued the smaller circle in the center of the larger one.

Then I glued them so they would slightly overlap in a small tight circle.

Very cute! I think they would also make great gift toppers. I'm going to make some more, but I'll add a few more circles to make the wreath bigger.
Have a GREAT weekend!
Thursday, December 16, 2010
Bottle Cap Wreath Ornament
Thank Goodness tomorrow is Friday! I am ready for the weekend...even though it's the weekend before Christmas and it's going to be CrAzY bUsY! (I've secretly always wanted to do the caps lower case crazy type.)
Today's ornament is Green...and not just in a Christmas Color way! I bought a six pack of mini-Mt. Dew bottles to make this recipe for Apple Dumplings. In case you were wondering...they were wicked good. So good I can't even talk about it! If you like sweet and cinnamony crispiness...head over there and try them out! Ohhhh...I just drooled a little...
Anyway...I've got these bottles and we recycle. But I'm looking at the caps thinking...I could make something out of them...they look like hard pom poms. WREATH!
Plus, they have this cool little star shape in the middle:
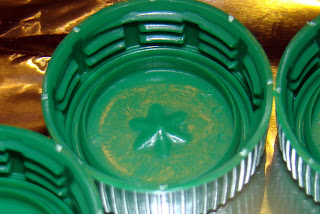
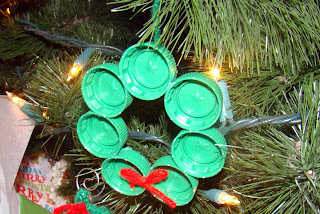
I arranged them in the wreathish shape I wanted and then hot glued them together and here's what I got:

Then I glued on a red yarn bow and a hanger on the back. I've really got to improve my bow/embellishing skills. Still, the simple yarn bow works with this wreath. Anyway...here's my quirky recycled ornament:
Today's ornament is Green...and not just in a Christmas Color way! I bought a six pack of mini-Mt. Dew bottles to make this recipe for Apple Dumplings. In case you were wondering...they were wicked good. So good I can't even talk about it! If you like sweet and cinnamony crispiness...head over there and try them out! Ohhhh...I just drooled a little...
Anyway...I've got these bottles and we recycle. But I'm looking at the caps thinking...I could make something out of them...they look like hard pom poms. WREATH!
Plus, they have this cool little star shape in the middle:


Then I glued on a red yarn bow and a hanger on the back. I've really got to improve my bow/embellishing skills. Still, the simple yarn bow works with this wreath. Anyway...here's my quirky recycled ornament:

Wednesday, December 15, 2010
Modge Podged Ornaments
I'm down to 10 more days of ornaments! What o' what will I fill my time up with after Christmas??? I'm sure I'll think of SOMETHING!


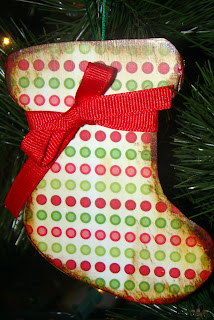


Today's ornaments are cute and simple! I found the idea here at Craft Rookie. So fun! They remind me of a set or ornaments my mom made back in the day. Only instead of cute paper and Modge Podge (one of my newest favorite craft medium), hers were paint by number. Very 1970's! I need to find a photo of those...
Anyway...I was wandering the aisles of Hobby Lobby (lately that is my main form of exercise) and I saw these wooden forms. A little light bulb blinked on, "Hmmmm. I remember a blog I read about these!" AND they were 4 for a buck, AND they were half off! Add happy jumping-jacks to my exercise routine!
So I came home and grabbed some Christmas scrapbook paper from my stash. I traced the wood form onto the paper and cut it out. Then I used Modge Podge to attach the paper to the wood. Let it dry. Then I used my Distress Ink pad to dirty up the edges...or age the ornament...whichever you prefer. I put another layer of Modge Podge on to seal everything up. When that dried, I added buttons and ribbons. Then I made a loop out of stitching floss and glued it to the back. Taaa Daaa!

Here's my star. I can just hear my Grandma Rita, "Why did you make it green? It looks dirty!"

Cute little stocking!

Candy Cane

And the Christmas Tree is my favorite!

Tuesday, December 14, 2010
Button Snowflakes
Today's ornament is a cute little snowflake made out of buttons!
Last year I bought a beaded snowflake kit for our kids to make up during Christmas break. Well...they weren't that big of a hit. The beads were really hard to put on and then they wouldn't stay on! So I packed it all away for another day. And that day came! Here are the metal forms:

I grabbed my button bag and picked out a bunch of small white buttons. Then I plugged in the glue gun and waited for it to heat up. Kat kept herself busy with the button bag:

Once the glue was ready to go, I hot glued buttons to each side of the metal frame. Here's the result:

Maybe a little wobbly, but I think it's pretty cute! And no two snowflakes are alike, right?
Monday, December 13, 2010
Poofy Ribbon Ornament
Oh...I just love the word "poofy". It makes me smile! Poofy. Smile.
Welcome to a new week! I'm a little bit addicted to scouring blogs when my kids are sleeping and I'm finding LOTS of new ornament ideas. So many ornaments...so little time left. I may have to start doubling up!
Today's ornament is HUGE. So huge my DH was wondering how I would hang it on the tree. A word about our tree...we have an artificial one. We've got some pretty serious allergies AND I'm lazy and don't want to be watering and vacuuming all December long. Anyway, we inherited my parents old tree and, frankly, it's got some bare spots. I like to think of them in terms of the Velveteen Rabbit...the tree has just been loved too much. Well, I found a nice loved empty spot and stuffed my super-sized ornament right in there!

Isn't it cute?!? I like to call it artsy-fartsy. I guess that means a big adorable mess! Our three year old asked me today, "What that doing on the tree? It goes on a present!" I found the idea here last year and didn't get around to it until now.
My idea was to just use the dark green ribbon and the red and white polka dot ribbon. Let me tell you...it takes a LOT of ribbon. Here's what I started with:

I cut five strips in each pattern and size. Didn't go far! You need LOTS of ribbon! Have I mentioned that? So much...I lost count. Here's my poof ball in the middle of the process:

Still a lot of baldness! This is when I added some of the other patterned ribbon. What you want to do is form your ribbon into a little roll (like you would with scotch tape) and then pin it to your foam ball. I started out using two pins per ribbon, but then I switched to one and that worked fine. For the hanger, I took a plain red ribbon and cut it longer than the rest. I pinned the heck out of it to make sure it was nice an attached. The end.
Sunday, December 12, 2010
Peppermint Candy Wreath
Well...the weekend is wrapping up and I just feel so cozy and Christmasie that I think I'll feature TWO ornaments today! That's right...TWO!

So that was the first one. As you can see...it was VERY complicated! I use these little bulbs to fill up pitchers and bowls and to decorate around the house. While looking at a red one...I thought it looked just like Santa's round belly! Add some black and yellow felt to make a buckle and belt and you're done! Isn't cute? It makes me want to say, "Ho! Ho! Ho!"
My next ornament is one we did last year. I found the idea here on Ramblings of a Crazy Woman. I LOVE her blog...she has such great ideas! Anyway, isn't the ornament pretty???

They are so bright and festive! And all you do is line a cookie sheet with foil. Arrange your peppermint candy disks ($1.00 for a bag at Wal-Mart) and pop them in the oven. I set our oven at 250 and I checked them every few minutes. At 10 minutes, you could tell the candy had melted enough and was starting to blend together. Take them out and let them cool. Then carefully peel the foil from the backs! I red & white puffy HEART these ornaments!!!
Saturday, December 11, 2010
Paper Globe Ornaments
Today the wind is blowing and the snow is falling and it's seriously getting me in the Christmas Mood!
Our ornament for today is another super simple one! I found the idea here. You need some scrapbook paper, a ruler, pencil, scissors, a hole punch and brads. I cut my paper in one inch by six inch strips and it worked, but next time I'd make them thinner and longer. I had some bending issues... So here is what I started with:

Punch a hole on each end of every strip. The I had ten strips ready, but I only ended up using six. Then stack your strips up and fasten them at one end with a brad.

Now the original poster fastened them on each side and then gently spread out the strips to create a globe. I couldn't get it! So I unfastened one side and spread out the strips.
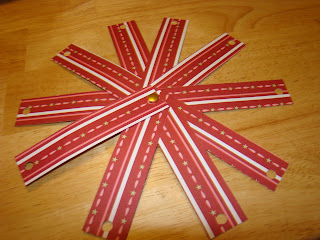
Then I flipped the whole thing over and bent each strip back one at a time to form the globe. When I had all the opposite side holes matched up, I fastened them with a brad.

Here is where I had to cut down my number of strips. Again, if I had cut the strips thinner, I think more strips would have worked out all right. In the end, though, it turned out great! Here it is on our tree:

Friday, December 10, 2010
Felt Button Bulbs
Happy Friday, Everyone!!!
Here is the ornament of the day:

I was feeling all Felt-tastical after my cute little felt owl from yesterday. I had visions of felt ornaments dancing in my head. Anyway...I think this turned out kind of cute. The buttons kind-of creep me out, though. They remind me of those new dolls that are out with the button eyes. And those dolls creep me out because they make me think of the movie, Coraline. Which, I'll admit, was a great movie...but on the disturbing side.
SO! Now that I've talked myself through my button-phobia, back to the ornament! I just plopped down some green felt and I used the bottom of a mason jar to outline a circle. I cut out two circles and then placed one down to arrange the buttons, like so:

I played around for awhile and ended up liking the three buttons that are on the finished piece. I stitched the buttons on first and then whip-stitched the two pieces of felt together, stuffing the middle before I completely sealed them up. Then I added some string to hang it with! Very easy!
But...there is a dark side to this ornament...I actually made TWO, but one ended up getting scrapped. As I was whip-stitching away (I really DO need to practice that more) my eyes strayed over to my bottle of tacky glue. And I thought, "Hey! We used that stuff ALL the time back in Girl Scouts when we worked with felt!" So I tried to glue my other ornament together. Yeah. Didn't work! Roll Ornament Blooper Footage:


Everything seemed easier in Girl Scouts!!! But I DID rescue the buttons to use another day...
Subscribe to:
Posts (Atom)