Showing posts with label Re-purpose. Show all posts

Saturday, December 24, 2011

Whooooooo is Hiding In Our Tree?

Merry Christmas Eve!

We celebrate Christmas Eve with my side of the family, so it's always a fun and family filled night!

Before we head out, I wanted to share Ornament #24!


Are they characters, or What??? I love them!

My inspiration (pinspiration!) came from here:

Source: flickr.com via Amy on Pinterest


I think owls are awesome! And TP roll owls are Awesome-er!


All it took was some paint, a black Sharpie, us going to the bathroom a lot (hahaha) and some great inspiration from by BFF Pinterest!

I hope you all have a Blessed and Magical Evening and a Merry Merry Merry Christmas Morning!

Friday, December 23, 2011

Giant Play Ring

Doing my last post on the Pomander Ornament reminded me of something!

With some of the extra felt rosettes I had, I whipped out this cute little Stocking Stuffer for Miss Kat!


It's crazy gaudy, right???

And it doesn't look so great on my Big Man Hands. Seriously...I my hands look like they've come through the Depression, or a Prize Fight minus the gloves.

But...I'm betting...it's going to look great on my Girlie's Dainty Princess Finger! And she loves anything over the top!

Here's how it worked.


I had a jillion of these felt rosettes made up.


Hmmmm...annoying ring pop! Do your kids love these? Mine do. And my parents love buying them for my kids. And my kids love putting half sucked on ones in their pockets. And my dryer loves smearing the sticky mess all over the rest of the clothes. But I digress. Force your child to eat a ring pop, then wash the base and snip off the little stem piece.


Start hot gluing your rosettes onto the newly flattened base! Or you could cut out felt flowers, or paper flowers, or buttons...whatever!


I was able to squeeze four rosettes onto the thing. Then I let the glue harden.


Pretty Play Ring Perfection!


Wednesday, December 21, 2011

Jingle All the Way!

Ornament #20! (aka Monday's Ornie)

I saw these Jingle Bell Flowers last year on The Crafty Crow. If you don't read The Crafty Crow...you need to! She has an amazing collection of ideas and they are fantastically organized!

Here's how mine turned out!


Super Close up!


They are so bright on the tree! I love the use of old egg cartons. Re-cycle Crafts are a big deal around our house. Head over to The Craft Crow for a great tutorial!

Monday, December 12, 2011

Candy Cane Ornament

Okay. You can stop pretending it's still Sunday!

I'm caught up to Monday!

I found this cute ornament idea at Anders Ruff. Since we love candy canes & puzzles...it was a Must!


It turned out HUGE...but super cute! I used a 100 piece puzzle of my son's that had some missing pieces. I would suggest, unless you want a giant ornament, using an adult puzzle...maybe a 500 or thousand piece.

But the Giant Candy Cane works for us! Our tree is getting some bald patches and this filled one up just fine!

I painted some pieces white and some red. I skimped on painting the backs. Then I arranged them in the shape I wanted & plugged in the glue gun.


Ended up only putting glue on the red (or top) pieces. A little dab on each tip, and then I pushed it into place on the tops of the neighboring white pieces.


Here's a shot of the back. Then I took some green ribbon to make a loop for hanging and a bow & I embellished with a cute little jingle bell!


Thursday, December 8, 2011

Cardboard Star

I've been noticing a lot of crafts using corrugated cardboard out there. I love a good recycle bin project, so I grabbed some cardboard and took the top layer off. Not knowing if it would turn out okay, I didn't take pictures. Memo To Self: Take Pictures.

I free handed a star on some scrapbook paper and cut it out.


Then I traced the star onto my ripped apart cardboard. I cut the cardboard star to be a little smaller and glued it on top of the paper star.


I apologize for photo inconsistencies...I can't figure out my camera!

Anyway, time to embellish!


I glued on a couple of buttons and I hot glued some twine to the back as a hanger.


And there my pretty little star is on the tree!

I'm thinking about making up some more and also doing some with the cardboard as the background and festive paper on the top.

We'll see. I've got a pile of gifts I still need to finish up. I'm feeling the Christmas Crunch!


Linking Up to Some or ALL of These Fantastic Parties!


Tuesday, June 21, 2011

Hair Clip Holder

I wanted to share this Hair Clip Organizer I put together for Kat. Bows and Frills and STUFF for the girlie's hair seem to be taking over. And these chicken wire frames seem to be EVERYWHERE on the blog-o-sphere.


What do you think???

The frame is an old one my parents found yard sale-ing when I was little. For the longest time it held a family portrait of my parents and myself...until it retired to storage in my parent's basement. I knew I wanted to try this chicken wire project, but I wasn't finding just the right frame. Then I remembered this beauty!

It was an ugly brown - under a few pounds of dust. So I cleaned it up and spray painted it with primer. My hubby found this green (or as he says "Tinker Bell Green"). It's kind of loud! But it looks great with Kat's Tinker Bell Purple walls!

I clipped the wire to fit the back of the frame. Then I used a staple gun to attach it and pull it tight. Easy Peasy Good To Go!

Now I just need to figure out how to hang it...maybe some cute ribbon?


ps...that's not the Tinker Bell Purple wall I was talking about. I've got the frame propped up on our piano in the living room!


Thursday, March 3, 2011

Headband Holder

I'm not a tom-boy. But I'm FAR from Girlie Girl. However...Miss Kat is slowly turning me in to a pink buying, bow making maniac!!!

So. Obviously when my neighbor ran over a couple of these...


...empty oatmeal containers I knew I could Sassy it up! And, yes, I'm so ridiculously crafty my neighbors save things with potential to ship to my house!

I cut that pretty purple & white scrapbook paper to fit around the container and I glued it on. Then I cut out a circle to fit the plastic top and glued that down, also. I had some shimmery purple ribbon and glued it around the edge of the plastic top. And...


It's the perfect size for headbands! And the inside of the container is a great place to store other Girlie Girl things!

Party Time!


Craft GoodiesSumo Sweet Stuff 


Friday, December 24, 2010

The "Amy Special" Ornament!!!

MERRY CHRISTMAS EVE to All!!!

Christmas Eve is the day that we've always celebrated with my mother's side of the family. Now that James and I have our own little family, it works out great because his family celebrates Christmas Day!

So I'm taking a moment from our crazy, busy, fun day to post this funky ornament I came up with. I call it the Amy Special...because it makes me feel...special...I'm babbling now...

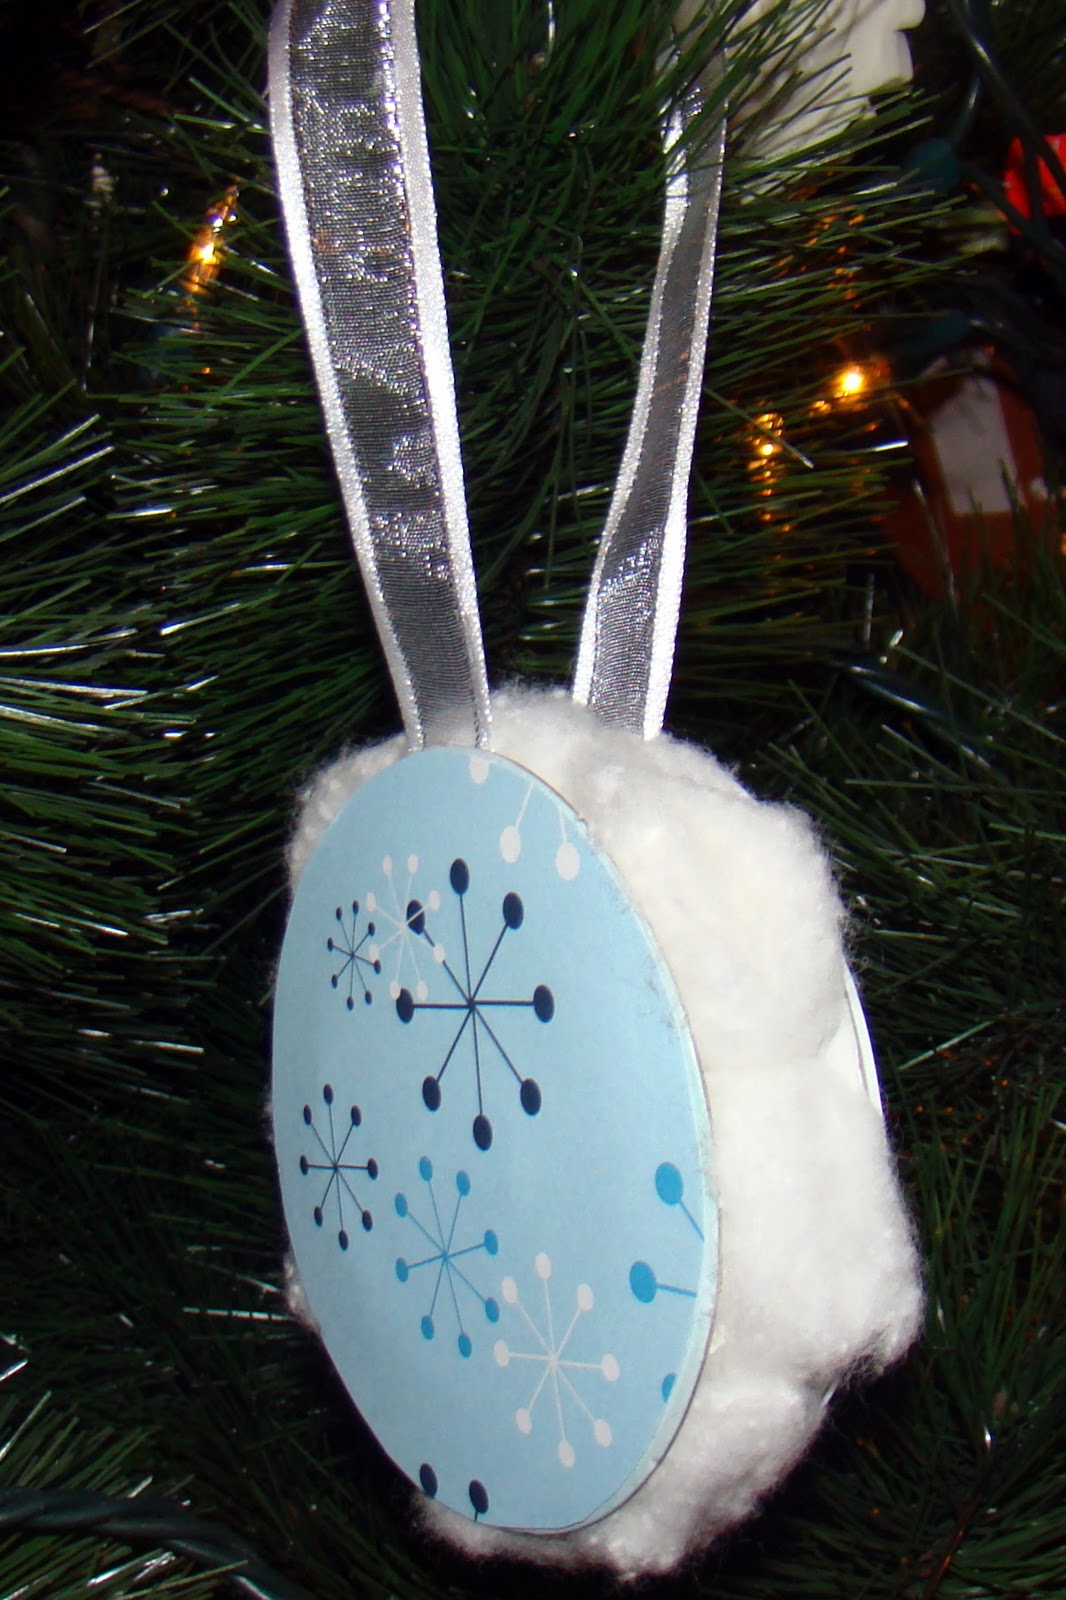
SO! I've used up 20 miles of ribbon this year and I've got lots of these in the recycle bin.


And I have a small forest worth of scrap paper that I'm sure I'll use SOMEDAY. So I traced my ribbon holder onto some cute paper.


And then I glued the circles onto each side. But there was a vast desert of cardboard where the ribbon used to be.


Hmmmm...snowflake paper. Snowflake fanatic. Lot's of cotton balls in my bathroom cabinet. EUREKA! I grabbed the bag of cotton balls and started cutting some in half. Have you ever cut a cotton ball in half? Those puppies have LAYERS. Cotton balls are like onions. Onions have layers. Sorry! I just had a Shrek moment!


Note the Ogre/Onion/Cotton Layers. ANYWAY! I glued the cotton balls along the barren cardboard.


Taaa Daaaa! A cute snowflake ~ cloud ~ frosty sandwich! Or, rather, the Amy Special!

For those of you who celebrate tonight, or tomorrow, or whenever...May your day be Merry & Bright! God Bless you and your families!!!

Thursday, December 16, 2010

Bottle Cap Wreath Ornament

Thank Goodness tomorrow is Friday! I am ready for the weekend...even though it's the weekend before Christmas and it's going to be CrAzY bUsY! (I've secretly always wanted to do the caps lower case crazy type.)

Today's ornament is Green...and not just in a Christmas Color way! I bought a six pack of mini-Mt. Dew bottles to make this recipe for Apple Dumplings. In case you were wondering...they were wicked good. So good I can't even talk about it! If you like sweet and cinnamony crispiness...head over there and try them out! Ohhhh...I just drooled a little...

Anyway...I've got these bottles and we recycle. But I'm looking at the caps thinking...I could make something out of them...they look like hard pom poms. WREATH!

Plus, they have this cool little star shape in the middle:


I arranged them in the wreathish shape I wanted and then hot glued them together and here's what I got:


Then I glued on a red yarn bow and a hanger on the back. I've really got to improve my bow/embellishing skills. Still, the simple yarn bow works with this wreath. Anyway...here's my quirky recycled ornament:


Friday, October 1, 2010

Back with a Project

It seems that I've fallen off the Blogging Wagon! This summer was a crazy hodge podge of activities, crafts, zoo trips, road trips...you name it! Now that we're in the school groove, it's time for me to dust off the computer and get back to blogging.
Yesterday my 2nd grader and pre-schooler both had a day off from school. It was a beautiful Fall day and we got LOTS of stuff done. Something I've been wanting to do for a long time, but never gotten around to was Crayon Cakes. I've got a leaf rubbing project that I want the boys to do this weekend and these cute little cakes are perfect for that and for chubby Kat hands!

I borrowed the idea from here, and followed the directions that I found here. This is our version:
Grab a bunch of old crayons. I found these packed away with my old toys at my parents house. They were battered and abused and ready to be repurposed! Pick off all the paper (kept Louie busy for half an hour!) and break them up. I didn't do anything to prepare the muffin tins. I also separated the colors, but I think mixing colors up would be fun, too!


Here they are ready to be "baked"!

I set my oven to 275 and checked on them every couple of minutes. I think it took about 8 minutes before they were completely melted and looked like this:

We let the tins cool for a few minutes and then put them directly into the freezer. Then we went for a walk (much like the Three Bears) and did some leaf gathering and playing at the park. We were gone for an hour and when we came back I turned the tins upside down and the Crayon Cakes popped right out!

This was a great fun project! The boys helped to peel and break the crayons. J was fascinated by the melting process and how something solid can become something liquid and then turn solid again only in a different shape. Louie loved the reuse/recycle aspects and I think I'm creating a Trash to Treasure Monster. We'll be doing this again. And again. And again...


Wednesday, April 7, 2010

Crafts of a Close Encounter

This week Louie is on Spring Break from school. Monday we hand an errand running day. Tuesday we headed to the Children's Museum which is always a blast. We've had a couple of library runs. AND we made these awesome planets for the Boys room! I saw the idea a couple of years ago on a kids activity site and I'd give them credit here, but I can't remember where I saw them!

You start off with used CDs, styrofoam balls & some kids who like to paint! We cut the styrofoam balls in half. Then I opened up the paint and passed out the brushes!


Louie did a great job. J. proceeded to paint my finger, his sock and some of the table. Eventually he got the styrofoam done! Here's what we ended up with:


We waited a day to let the paint dry. Then I plugged in the hot glue gun. I shot the glue and Louie positioned and pressed the styrofoam in place. Just attach a ball half on each side of the CD and you have an ultra-cool planet that looks like this:

I'm just trying to figure out how to hang them from the ceiling! The boys loved the rainbow patterns the CD reflected onto the walls and ceiling when the light from outside hit them. Here is our collection of planets: